Installing the Savage Improved Extractor Kit

Posted in DIY, New Kit, Product Reviews, Savage on December 1st, 2017 by Preston Lewis

WARNING

Warning!

Before starting work on any firearm be sure that the firearm is clear. Do not touch the trigger until the firearm has been cleared. Inspect the chamber to ensure that it is clear of ammunition and that there is no ammunition positioned to be chambered. Do not keep live ammunition near your workspace. Once you have checked the firearm, check it again!

Tactical Works, Inc. takes no responsibility for the accuracy and/or safety of this “how to”.  This post is simply for your reading enjoyment. Before shooting any firearm have it inspected by a qualified gunsmith.


In this Do-It-Yourself Tutorial, we will be installing the Savage Improved Extractor Kit.

List of tools you need to accomplish this installation successfully.

  • Clean Workspace
  • Tweezers
  • 1/6″ punch
  • Small mallet
  • Small flathead screwdriver
  • Compressed air or canned air
  • 4″ piece of packing tape
  • Gun oil
  • Good set of eyes (joking but for real!)

This kit consists of a modified extractor, larger extractor detent ball, and custom ejector and ejector spring.

*Some of the installation pictures show the original kit parts. The new kit parts (pictured above) may look slightly different but the installation steps are the same.

Step 1: Remove the bolt from your rifle.

Step 2: In this step, we will be removing the OEM Extractor from the bolt head. Take your flathead screwdriver (make sure it is small enough to fit in the slot in front of the extractor) and place it flat against the extractor. With a small amount of pressure, push the extractor toward the outside of the bolt face as shown in Figure 2-1.  Make sure while you are pushing the extractor that you keep a hand over the bolt face because the detent ball underneath the extractor will shoot out if you’re not careful.  See Figure 2-2.

Step 3: Once the extractor is clear of the bolt and the detent ball is captured, use your tweezers to pull the spring out of the blind hole. See Figure 3.1. Lay the OEM extractor and detent ball on the piece of tape as shown in Figure 3.2. Lay the spring to the side as you will reuse it with the new extractor. Figure 3.3.

Step 4: Once the spring is removed from the blind hole, take your air compressor or canned air and blow the blind hole out to get any residual dirt, dust or grime out. Apply a few drops of gun oil into the hole as well as on the spring and place the spring back into the blind hole (either direction, doesn’t matter). See Figure 4.1. 

Step 5: Place the new (larger) detent ball on top of the spring. It should sit on the spring sticking out above the bolt face. See Figure 5.1. 

Step 6: In Figure 6.1, notice the new extractor plate. The detent ball indention faces the bolt and the extractor lip faces the inside of the bolt face.

Step 7: Slide the new extractor into the slots in the bolt head until it contacts the detent ball as shown in Figure 7.1. Use your small flathead screwdriver and carefully push the detent ball down below the surface of the bolt face and slide the extractor plate in over the detent ball simultaneously. You will hear it snap into place. See Figure 7.2.

Step 8: Look for the ejector pin hole on the opposite side of the bolt as the extractor. This pin only comes out one way and only goes in one way. You will see an inlet on the top of the bolt head. This is the side where you will insert your punch. See Figures 8.1 and 8.2 for pin removal direction. Use your 1/16″ punch and insert it into the hole. Lightly tap the pin out of the bolt head until the pin is clear of the bolt head. Cup your hand over the bolt face and pull the punch out in the opposite direction.

Note*** Be sure that you capture the ejector rod and spring when you extract the punch as it is under pressure and will projectile if your hand is not over the face of the bolt.


Step 9:  Again, use your air compressor or canned air to blow out the ejector rod hole making sure to get any trash or sand out. Apply a few drops of gun oil into the hole and the new ejector spring as shown in Figure 9.1.

Step 10: Install the new ejector spring onto the new ejector rod. If you look at the ejector rod (as shown in Figure 10.1) there is a slot cut out on one side of the rod. Position the “cutout” facing toward the small extractor retention pin. Once you have the cutout in the ejector positioned correctly toward the pin, insert the ejector and spring into the blind hole.

Step 11: This next step is a little tricky…. Use your thumb to depress the ejector into the hole while simultaneously pushing the pin into the retention hole. Remember that the pin can only be inserted one way. See Figure 11.1.

Step 12: Once the pin is in place, push the ejector down a few times to make sure that is functions correctly and doesn’t bind. See Figure 12.1

Step 13: Install the bolt back into the action and cycle it forward and back. Hand feed an EMPTY case into the chamber and close the bolt. Cycle the bolt. Cycle the bolt rearward and make sure that the case ejects and kicks away from the gun. If this is successful, YOU ARE FINISHED!

**Note: Sometimes with installation you will find your bolt is hard to close. With the new parts being all stainless steel they are stiffer and may need some help mating up and breaking in. If you experience this problem you will need to place an EMPTY CASE in the chamber and slam your bolt. You may have to work your bolt to loosen it and may need to cycle it as above several times (sometimes upwards of 100 times). Then you should be good to go. As always just call or email us with any questions or concerns.

The Savage Improved Extractor Kit is a great upgrade to your Savage 10/110 and Savage Axis rifle. With this kit, you won’t have to worry about hung cases or failure to extract anymore. And it will kick the cases further away from the gun. 

You’ll be glad you spent the time to install this kit. It really adds a piece of mind knowing that your rifle is going to eject without a doubt whenever, wherever.

As always,

See you on the range!!

Preston

Tags: , ,

Installing the SSS Savage Competition Trigger

Posted in DIY, Savage on November 10th, 2017 by Preston Lewis


WARNING

Warning!

Before starting work on any firearm be sure that the firearm is clear. Do not touch the trigger until the firearm has been cleared. Inspect the chamber to ensure that it is clear of ammunition and that there is no ammunition positioned to be chambered. Do not keep live ammunition near your workspace. Once you have checked the firearm, check it again!

Tactical Works, Inc. takes no responsibility for the accuracy and/or safety of this “how to”.  This post is simply for your reading enjoyment. Before shooting any firearm have it inspected by a qualified gun smith.

Installing the SSS Savage Competition Trigger

SSS Savage Competition Trigger

SSS Savage Competition Trigger

In this DIY tutorial, we will be installing a Sharp Shooter Supply Competition trigger in a Savage Model 10 FCP-SR. This trigger is a great value and will take your rifle and accuracy to the next level. The SSS Competition Trigger has an adjustable pull range from 2 pounds to 12 ounces. It also comes with installation instructions as well as allen key wrenches. In order to have a successful trigger install, below are a list of tools needed.

  • Dremel Tool with a diamond dremel bit
  • Vise
  • Set of Allen Wrenches for stock or chassis removal
  • 1/8” drift punch to remove the main trigger frame pin
  • Small pair of Needle Nose Pliers to re-install the bolt release spring
  • Blue Loctite
  • Torque Wrench to reinstall the stock or chassis

Before you start, MAKE SURE YOUR GUN IS CLEAR AND UNLOADED. I cannot stress this enough. Safety First!!!

Step 1- Remove the bolt from the action

Step 2- Remove the front and rear action screws. (On a stock, you will remove the forward screw and the screw in front of the trigger guard. On a chassis such as a Stealth/MDT LSS chassis, you will only have 2 screws, remove both of them.

Step 3- Place your barreled action on a flat surface with the trigger facing up.

Step 4- Take your 1/8” drift punch and remove the Main Trigger Frame Pin shown in Figure 4-1.

SSS Savage Competition Trigger Installation

Figure 4-1

Once this pin is removed, slide the whole assembly forward towards the muzzle and pull up. It will come right out. Remove the bolt release lever and spring shown in Figures 4-2 and 4-3 below.

SSS Savage Competition Trigger Installation

Figure 4-2

SSS Competition Trigger Installation

Figure 4-3

Step 5- Carefully remove the “C” Clip on the side of the Accutrigger and pull the trigger pin out. Pull the entire trigger free of the frame and lay it to the side.

Step 6- Take the main trigger frame and put it in your vise so you will have a steady working surface as shown in Figure 6-1. (Only for Accutrigger Models will you have to modify the main trigger frame. Pre-2004 Savages have a different trigger frame that does not need to be modified.)

SSS Savage Competition Trigger Installation

Figure 6-1

Step 7- With the diamond bit in your dremel tool, carefully grind a slot into main trigger frame to allow clearance for the stud on the SSS trigger. (Looking at the frame from the front with the holes facing up you will be grinding the left side) As shown in Figures 7-1 and 7-2

SSS Savage Competition Trigger Installation

Figure 7-1

SSS Savage Competition Trigger Installation

Figure 7-2

Step 8- Grind a little at a time and slide the SSS Competition trigger into the frame until the frame sits right against the new trigger housing as shown in Figure 8-1. (You don’t want anything binding as your trigger will not function properly if anything is smashed.)

SSS Savage Competition Trigger Installation

Figure 8-1

Step 9- Once your new SSS trigger will sit perfect in your trigger frame with the two back feet shown in Figures 9-1 and 9-2 sitting on top of the trigger frame and the screw holes (frame and trigger holes) lined up perfectly, insert the provided machine screw through the hole (doesn’t matter through which side) and thread the provided nut onto the screw on the opposite side. Tighten the screw with the provided allen key until it is snug. DO NOT TORQUE THE NUT DOWN!! Apply a small amount of blue LOCTITE in the middle of the nut being careful not to get any into the trigger.Wipe off excess if needed.

SSS Savage Competition Trigger Installation

Figure 9-1

SSS Savage Competition Trigger Installation

Figure 9-2

Step 10- Once the SSS Trigger is installed in the main trigger frame, place the lip on the back of the frame into the slot in the rear of the action.

Step 11- Re-install the bolt release lever the way you took it off as shown in Figure 11-1 below.

SSS Savage Competition Trigger Installation

Figure 11-1

Step 12- Slide a small allen wrench through the holes of the bolt stop lever, main trigger frame and action as shown in Figure 12-1 allowing all of the components to line up correctly.

SSS Savage Competition Trigger Installation

Figure 12-1

Step 13- Install the bolt release lever spring with the small pair of needle nose pliers and push your allen wrench through the spring and all the way through the bolt release.

Step 14- Take your main trigger frame pin and slowly push it through the hole on the spring side pushing the allen key out. (Exactly the opposite way you inserted the allen key.) This step may take some fooling with but take your time and you will get it. See Figure 14-1. (Main trigger frame pin re-installed)

SSS Savage Competition Trigger Installation

Figure 14-1

Step- 15- Slide your safety tab to the rear  in the “Safe Position”. Use the smallest provided allen key to adjust “Screw D” clockwise until it touches the safety bar. (You can see it under the trigger housing). Once it is touching the safety bar, back it off 1/8 of a turn counter-clockwise. Install your bolt and “cock the gun” and pull the trigger and make sure IT WILL NOT FIRE WITH THE SAFETY ON!! If it does fire with the safety on, turn the screw clockwise until it won’t, making sure that your safety tab slides back and forth freely without binding.

SSS Savage Competition Trigger Installation

Figure 15-1

Step 16- “Screw C” is your Overtravel Screw. This screw will set your desired over travel. Turning the screw clockwise reduces the overtravel and counter-clockwise increases over travel. (If this screw is adjusted in all the way clockwise, it will not allow the trigger sear to engage.If this happens, turn the screw counter-clockwise until the sear will engage the trigger.)

Step 17- “Screw A” is the Sear engagement adjustment screw. A majority of your pull weight will be associated with this screw. This screw comes set from the factory for minimum sear engagement. It is advised to adjust this screw no more than one turn clockwise to reduce sear engagement, if you adjust this screw counter-clockwise, it will increase your trigger pull weight. Reducing the sear engagement introduces the risk of a slam fire or accidental sear disengagement.

Step 18- “Screw B” is your Trigger Pull Weight adjustment. You can set this screw where you so desire. Turning the screw clockwise increases your pull weight and turning it counter-clockwise reduces the pull weight.

Step 19- Once your trigger is adjusted to your preference, cycle the bolt no less than 100 times making sure you have no slam fires or unintentional sear disengagements. Also make sure your safety engages as well. SAFETY FIRST!!!!!!!!!!!!

Step 20- Once you’ve deemed your rifle “SAFE”, carefully lay the barreled action back into the stock or chassis. If you have a Savage Accustock, you will not have to modify the trigger guard or stock when reinstalling. If you have a Savage Stealth or MDT LSS chassis, you will have to open up the trigger hole about a ¼” forward to clear the new trigger housing. Your dremel with the same bit will do this easily.

Step 21- Once your action is sitting in your stock or chassis with no interference, apply a liberal amount of blue Loctite to the ends of the action screws. Thread the action screws into the actions and hand tighten them. With your torque wrench, tighten the rear action screw to 60 inch pounds and same for the front action screw. Once both screws are tightened to 60 inch pounds, tighten the rear action screw to 65 inch pounds.

You can, at any time, reinstall the Savage accutrigger. This modification isn’t permanent.

YOU’RE DONE!!!

Trigger Install Complete

Trigger Install Complete

Trigger Install Complete

Trigger Install Complete

This install is well worth the finished product, I promise you!!!

As always, see you at the range.

Project Savage: Choate Tactical Stock Installation

Posted in DIY, Project Savage, Savage, Tactical Works Home on July 7th, 2014 by Team TW

Savage Choate Tactical Stock


One of the upgrades that many shooters leverage is an upgraded aftermarket stock.  In a previous post we detailed the feature’s that this shooter is looking for which are drop-in-fit, full length bedding block, pistol grip,  free-floating barrel, immediately available, and not too expensive.  The Choate Tactical Stock fit the bill and the decision was made.

The rifle is a Savage 10 Hog Hunter in .223.  The Hog Hunter ships with an economical stock better known as the “Tupperware” stock.  The stock does have bedded pillars but is too flexible for reliable repeatable groups.    Some Savage rifles have the Accustock which will have three action screws.  The Savage Target Actions will also have three actions screws.  The Hog Hunter has two action screws.  This installation will focus on Savage actions that have two screws however we will try to address the three screws actions where we can.

Read more »

Project Savage: Choate Tactical Stock

Posted in Choate, Product Reviews, Project Savage, Savage, Tactical Works Home, Uncategorized on August 20th, 2013 by Team TW


Choate Savage Tactical Stock10

One of the most common upgrades for Savage 10/110 rifles is an upgraded stock.  The original “Tupperware” stock is very lightweight and is easy to handle however, in some situations the OEM Savage stock is too light.  If this was a dedicated hunting rig that would see miles on foot in the back country it might be a good stock however, it would need to be “enhanced” to overcome some of the weaknesses.

Read more »

Project Savage: Range Report #1

Posted in Project Savage, Savage, Tactical Works Home on April 15th, 2013 by Team TW
Savage Model 11 Hog Hunter .223

Savage Model 11 Hog Hunter .223

Good Friday presented an opportunity to skip out of work a little early and head to the range. I was invited to visit the new COOP range that was recently opened in Colorado Springs, Colorado. The Cheyenne Mountain Shooting Complex is a joint project between the US Army, El Paso County, the El Paso County Sheriff, and the Colorado Division of Parks and Wildlife.

Savage 11 Hog Hunter First Range Report

Cheyenne Mountain Shooting Complex


Most of the other ranges in the area at least 30 to 45 minutes outside of town. The Cheyenne Mountain Shooting Complex is a quick 5 minutes south of Colorado Springs and right off the main highway making this range a welcome addition to the local options. In addition this range offers distances ranging from 25 to 1000 yards.

Savage 11 Hog Hunter First Range Report

Cheyenne Mountain Shooting Complex

I was impressed with the friendliness and professionalism of the staff as well as the overall layout and condition of the complex.  As they say, a bad day shooting beats a good day at the office.

And so as the invitation was extended to visit Cheyenne Mountain Shooting Complex, the Savage Hog Hunter was pulled from the safe and prepped for an informal range report.

Savage 11 Hog Hunter First Range Report

Notice the black steel target @ 450 yds. Left of the furthest orange chevron

The Hog Hunter has been somewhat of an interesting build that has taken much longer than originally anticipated. When the rifle was originally dropped off it was new in the box. The initial inspection was, well, not too good. There was visible rust on the action as well as around the scope mount screw holes. After pulling the plugs out of the receiver it was noted that the rust had taken home under the plugs. The owner decided to return the Hog Hunter to Savage since it was brand new. After three-weeks the rifle was returned rust free with the scope mount holes re-threaded and an EGW scope rail mounted.  Savage held true to the statement  ‘it’s not the mistake that’s made but how the mistake is handled’.  In this case Savage went above and beyond to right a wrong. Considering the political climate the turn around time was super fast and the gifting of an EGW scope rail was unexpected.

The next unfortunate mishap happened after the owner dropped off the scope that is to be mounted to this build. The scope was a Falcon Menace 6x18x56. The exterior of the scope looked like it had just been pulled from the box. However, a quick glance through the tube exposed a shattered internal lens. The owner was in shock stating that the scope had been in his safe unused for two-years.  We spent a few minutes discussing other optic options and it was decided he would try to contact Falcon for a replacement. His first attempt was to go straight to Falcon. Unfortunately  their response was to not send it to them but to send it back to the distributor where he originally purchased the scope.  The scope was acquired via a group buy on a forum so he didn’t get his hopes up and figured he had a $400 paperweight at best. He contacted Annie’s Gun Shop in California who had initiated the group buy. Martin, one of the owners responded to his email suggesting he send the scope to him and he would engage with Falcon to fix the issue.  Excited,  but skeptical, he sent the scope to Martin. We again discussed other optic options and started to narrow down a nice replacement.  Less than two weeks after the scope was sent to Martin, a new in the box Falcon Menace arrived at his house. Surprisingly, Martin replaced the 6x18x56 Menace with Falcon Optics new 4-14×44 Front Focal Plane (FFP) scope. “Hats off” to Martin, Annie’s Gun Shop, and Falcon Optics for standing behind the limited lifetime warranty.

Because the goal of this project is to document and test the upgrades specified by the owner we needed a base line to test against. To get an out-of-the box baseline for the Hog Hunter an EGW scope mount, Burris Xtreme Tactical scope rings, the Meanace 4-14×44 FFP scope, and a Harris 6″-9″ bipod were installed on the rifle.

Savage 11 Hog Hunter First Range Report

Breaking in the barrel would be a great chance to get a baseline to see how the Hog Hunter will preform out of the box.  A total of 20 rounds were shot which is less than planned only because the range closed and we ran out of time.

To break in the barrel “off the shelf” (pre-political climate statement) Remington 55 grain rounds were used. Because time was short, the Hog Hunter was shot using the bipod and a rear bag. The next range report will include a shooting rest to provide a stable and repeatable shooting platform.

Savage 11 Hog Hunter First Range Report

Last three shots of the day. Group was getting much tighter at 100 yds.

As you can see from the target above the last three shots were pretty tightly grouped at 100 yards. With the help of a shooting rest and a better load,  the Hog Hunter should be able to produce great out of the box groups.

The overall sentiment of the Savage Model 11 Hog Hunter at this point is, impressive! The trigger pull needs to be lightened a bit, the “tupperware” stock flexed terribly when simply moving the rifle to get on target, and the bolt handle is a little short and tight to the scope.  The rifle could also benefit from a little higher comb and more of a “pistol grip” style stock/grip.

As seen in photos of the Hog Hunter the Harris bipod legs are fully extended. Just for fun we were engaging the steel target at 450 yds. as “cease fire” was called out by the RSO (range safety officer). With any luck our next range report will hopefully include a report of a few “pings” on steel.


Long distant Shooting, Year-One

Posted in Choate, Savage, Tactical Works Home, Uncategorized on July 20th, 2012 by Team TW


Not everyone is comfortable sharing their knowledge with just anyone, anymore. We’re all beginners at something sometime and we all have to start from somewhere. Many times we’ll find an interest and want to learn more. Reading books and articles isn’t too intimidating however, being new at something and approaching someone who is a veteran or an expert is tough. Its humbling to admit we simply don’t know it all.

Ralph Hicks sent us his story about what he learned in his first year of long range shooting. I’d like to call it “The Quest to 1K” but out of respect for Ralph we’re leaving his words exactly as they came to us.

We want to thank Ralph for unselfishly allowing us to share this. It’s guys like Ralph who make the world a better place to live in.

Congratulations Ralph!


Long distant Shooting Year-One

By: Ralph Hicks

I began this journey a year ago and fast discovered there was no place for a novice rifleman to find all the basics of long distance shooting in one location. There are many great blogs and a few good books, but no definitive source for the novice shooter who has yet to hit that 1000 yard mark. I read several books, articles, and blogs and tried to absorb all the advice I could get from experts at the range before I had a comprehensive understanding of how to conquer all the factors that come with shooting long. Now, after less than a year I can consistently shoot to 1000 yards with my Savage Long Range Hunter after I replaced its stock from Tactical Works along with a monopod, and skimmed bedding it.

The folks at Tactical Works are simply the best they provide the best customer service I have experienced.

I have practiced traditional martial arts all my life, and never would have thought that shooting a rifle over long distances is akin to being an accomplished martial artist. Shooting long distances requires a precision of focus that most martial artist only acquire after years of mental training. Similar to martial arts, I found that there is a celebration of mind, body, and rifle when all the hard training comes together and the force of the bullet catapults the steel target; you see the paint on the target vaporize and for the first time you realize you have obtained your 1000 yard goal.

When done correctly there is a moment right before the trigger is pulled that the world seems to stop and in that moment of silence the mind sees where the impact of the bullet will occur, this silence is so profound you can literally hear your heart slowly beating. Then, without notice comes the conscious recognition that you have just pulled the trigger; two seconds later, as the sound waves travel back to your ear is the sound of your bullet hitting metal. This gong sound is the reward for your achievement. This is also the moment when we become hooked; it becomes an unstated drive of ambition to achieve greater perfection with each shot. Once hooked, we continually turn our thoughts to how we can shoot consistently, shoot in all weather conditions, and how we can make our groups smaller and smaller. This is my simple contribution to guide the novice in their journey, written as a novice to a novice.

Equipment

Buying inexpensive twice is more expensive than buying quality once. Buying good optics is as an important as the purchase of a good rifle.

This first step, if done right allows you to keep your scope as you move  to more precise rifles, and the great news about this sport is that  there is no end to how much you can spend, which I am sure will thrill your spouse. The cost of your scope is going to be about the same cost as your rifle, or more, it’s just something you have to accept from the very beginning.

The very first choice you have to make is the caliber size. Today there are so many calibers to choose from it can be overwhelming. You have to ask if the gun is for a single purpose or will it serve many roles such as hunting, target, or perhaps a property defensive weapon. If it serves more than one purpose then every expert will tell you that compromises will have to be made. Compromises start with the caliber you select. The trend today is towards the 338 Lapua, the same caliber our great American snipers used in the sandbox to dispatch targets from a mile and half away. The 338 Lapua is truly a fantastic round and is designed to offset the disadvantages of the .308 and 50 cal. rounds. The 338 warms up at 1000 yards and has the ability to cut through body armor a 700 yards. There are, however, two big issues: costs and land. Ask yourself do you really have enough land area to safely fire it, and is your pocket book big enough for $6.00 a round? If you have both the money and the land, go with the 338 Lapua. Safety comes first, so keep in mind you have to look beyond your target to ensure you will not injure someone beyond your target range. For the 338 Lapua that means a clear path for two and half miles or a big mountain to stop its force. On the other hand, if you are only shooting target or smaller game, the 6.5 round has great ballistics and are easy to reload. My choice was .308. This round has served the sniper community for decades and is still what most expert long distance shooters use. My caliber needs are suited around shooting long plus protecting my small ranch in San Diego.

After the caliber is selected the fun part begins, the purchase of the  rifle. Precision shooting at long distances requires a bolt action rifle. There are many great semi-autos; however, for precision shooting a bolt action is the best path because you can finely tune the ammo to the rifle. Today there are so many great guns at affordable prices that any list here would be incomplete. FNH, Remington, Savage, Tika, Howa, and others can be bought for less than $2,000. I started with a Savage but fell in love with FNH SPR series of rifles. I went to an FNH rifle because of the criteria I put a rifle through, which is whether the military, law enforcement, or top ranked shooters are using it. The FBI chose FNH and so has many top competitive shooters, so I joined the FNH family too. When buying a rifle take a hard look at the type of barrel, trigger, action, and stock. All have to work together to form a precision rifle. Few out of the box rifles have the complete package. The FNH A3G shoots sub MOA and FNH backs what they produce.

A great barrel and precision trigger leads to success. As you become more advanced the action and stock become the areas to refine. There are many types of barrels but a heavy barrel will provide the weight and the stability needed when shooting past 600 yards. Stainless steel typically carries the day but the chrome mollies are also incredible. A fluted barrel vs. non-fluted seems to be controversial for reasons that escape me. My best advice is to go to a good barrel maker’s web site and read what they have to say on this topic. I chose the FNH fluted barrel rifle for its cooling and lighter weight advantages. Most top barrel makers have reached the same conclusion when it comes to a fluted barrel.

It seems like all manufactures are now proclaiming 1 MOA precision from their rifles. Many rifles can achieve 1 inch groups at 100 yards; and many hold that level of precision past 100 yards. The question you need to ask is what type of ammo is needed to hit 1 MOA or sub MOA and what happens to the groups when shooting past 100 yards? Few rifle manufactures will ever say sub MOA with factory ammo past 100 yards, so dig past these claims, look at the complete rifle package and what others are saying about it on the many great web sites out there: The Long Range Hunter, Snipers Hide, or Sniper Central are all a wealth of information and the experts freely dispense advice to the humble beginner. A MOA (1/60 of 1 degree of angle) is just one measurement and it only measures one element of the rifle; look at the barrel, its twist rate, is it heavy or light, is the trigger adjustable, is the stock stable, beaded, and stiff, is the action reliable and finely tuned, and how will it hold up after several thousand rounds have gone through the barrel are questions you need to ask before you buy. When the FBI chose the FNH they put 5,000 rounds through it without a single failure.

There are a number of “rules of thumb” formulas that you should understand to be proficient in long range shooting. Once you start shooting you will want to measure group size to determine how the gun is performing and what ammo produces the best results. The way to measure  group size is to take the average group size in inches and multiply it  by 95.5 then divided it by the distance in yards (Group size x  95.5/distant=MOA),of course the real reason for knowing group size is so  you can brag to your friends.

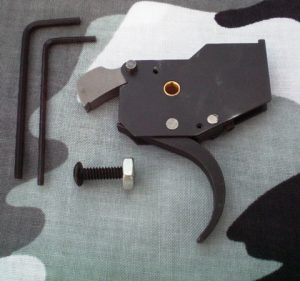
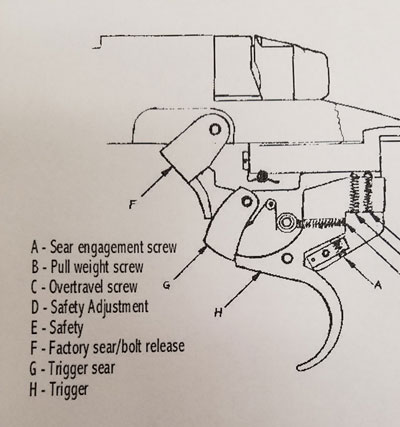
The trigger should be adjustable and crisp, here are many great aftermarket triggers as there are barrels. More rifles are coming out with adjustable triggers. Adjustability is important because as your shooting skills improve you can lower the amount of pressure required to pull the trigger, but starting with a light trigger, less than 2 pounds could cause an accidental discharge and could end your shooting career tragically. As your skills become consistent and shots become longer, the trigger weight should come down or the trigger should be replaced with a good aftermarket trigger.

Ammo

A term you will hear is “twist rates.” Twist rate is the amount of groves cut into the barrel that forms the rifling, it is what keeps and gets the bullet spinning. A barrel’s twist rate must match the weight of the bullet. Most manufactures know how to match barrel to bullet size and in the beginning stages of shooting you should not get over concerned with twist rate. You will see twist rate like: 1:10, 1:11 or

1:12 in most 308’s. The lower the number, the faster the rifling sends the bullet spinning. A heavy bullet usually requires a faster rate of twist rate; however a 1:12 rate will handle 155-180 grain bullets. In the 308: 155, 168, 175 grain bullets are the most common. In most cases the heavy bullets will do better in higher wind conditions and be more consistent to the target, I use 175 Sierra Match Kings. However, a lighter bullet that produces higher velocities will allow the bullet to hit the target faster. Speed equals power, so the faster the velocity the flatter the trajectory.

Not all ammo is created equal. Cheap ammo will produce poor consistency and dirty the barrel. It does not pay to go with cheap ammo. Federal Gold Match, SSA, Black Hills and Hornady and others make great ammo.

Cheap ammo past 500 yards will have you chasing your scope dope and lead  to a very frustrating day, and once home you it will take twice as long  to clean your rifle.

Ballistics

Basic ballistics is something every shooter needs to know. A bullet is  impacted by numerous environmental factors along with the internal mechanics of the rifle, a bullet made to kill game is a lot different  than a bullet made to hit a piece of steel at a 1000 yards and both have  very different ballistics. You will need a ballistic calculator to set the correct elevation and windage DOPE (Data on Personal Equipment) on your scope. There are at least three things you need to know about your round before plugging data into a ballistic calculator: its ballistic coefficient, the grain weight, and the velocity for the caliber of the bullet you’re using. Most manufactures post velocities on their web pages. A ballistic coefficient determines the aero dynamics of the bullet, it is stated as ”BC”. The higher the BC, the better the fight path. For example a 175 grain bullet typically has a BC of 505 and the

168 grain has a BC of .488. Plug this data into the many online calculators and you will save ammo and prevent frustration. I use the JBM calculator.  The BC is also often found on the web. The best way to determine velocity is to purchase a $200 chronograph which is set up about ten feet down range from the rifle and a round is shooting through a triangle of heavy gage wires; a digital readout then gives the bullet’s precise velocity.

Weather Conditions

How your bullet travels is called trajectory which is impacted by wind, temperature, elevation, humidity, and density. These key weather conditions need to be plugged into the ballistic calculator as well.

Hand held weather stations can be purchased and will provide this data.  Kestrel makes a fine hand held station and is used by many shooters, but learning to read wind speed and its direction with your own instincts and observations will set you apart from the pack and can be practiced off range anytime.

Wind

Wind impacts the horizontal path of the bullet and in some cases the vertical path. The first step is to determine the wind direction. The angle of the wind to the path of the bullet will either have a big impact on the horizontal travel of the bullet or a minor impact. The angle of the wind is expressed in “values.” A full value wind is a 90 degree wind blowing either ‘right to left’ or ‘left to right’ across the barrel of the rifle. A half value wind blowing at a 45 degrees has half the deflect impact on a bullet then a full value wind, and a 30 degree wind has a third of the value of a full impact wind. As an example, if you have a 10 mph wind blowing across your rifle at 90 degrees the windage adjustment will be greater than the same speed wind from a 45 degree direction. If you have a 10 MPH full value wind and a range of 500 yards the bullet will deflect off course by 18 inches and the adjustment needed is about 3.4 MOA for a 175 grain bullet while a half  value wind will only blow the bullet of course by 9 inches and the MOA  adjustment is 1.7.

There are three basic ways to determine speed and direction, without the expense of a handheld station;

  •  How the wind is causing grass or parts of a tree to move,
  • The direction and angle of the flags on the shooting range, or
  • A mirage.

There are books written just on this topic alone. Gentle breeze on your face with the grass moving just a bit is approximately a 5 MPH wind. When tree leaves are moving more rapidly and the grass is bending over the wind speed is 8 to 10 MPH. When tree branches are bent or swaying the wind speed is typically moving in excess of 12 to 15 MPH. Once you start getting past 20 MPH of a full value wind it may be wise for the novice to call it a day. A full value wind at 20 MPH will send a 175 grain bullet 33 inches off course at 500 yards, and at 1000 yards 163 inches off target (that’s 13.5 feet off course at 1000 yards).

Experienced shooters make these wind reads and adjustments without issue, but a beginning shooter should stay within their limits. Remember winds are rarely a constant, wind gusts or a sudden drop in wind speed is more the norm. The more experienced shooter will adjust to these changing conditions by holding over the sight, adjust windage on the scope, or wait before a shot is taken in a high or unstable wind condition.

The second way to determine wind speed and direction is by range flags. Range flags are easier to read and basic math can be used to determine speed. The first observation is to determine the direction of the flag and determine rather it is a full, half or third value wind. Also observe if the wind is blowing right to left or left to right. The direction of the wind determines if you should dial your windage clockwise or counter clockwise. Next determine the angle of the flag. A flag posting at 90 degrees is a strong wind and you can determine the speed by dividing 90 degrees by 4, equaling a 22 MPH wind or more. If the angle of the flag is at 45 degrees, again divide by 4 and you have an 11 MPH wind, and a flag posting at 30 degrees is a 7.5 MPH wind.

The third and most difficult method of reading the wind is by mirage. Mirage can help or hurt you. A mirage is caused by the heat rising off the surface of the range. It can be read much the same way as a flag. If you look inside the mirage you can see both direction of the wind, (by how it is being pushed from one side to the other), and you can determine speed by how the wind is bending the mirage. Like the flag math in the above example you can also determine if it has a 90, 45, 30, or 15 degree angle wind. (Angle of bend/4=MPH).

But mirages can also deceive you. You may think you are shooting straight at the target but it may only be an optical illusion; no different than if you place a stick in a clear stream and see how it looks bent once you dip it in the water. Your shot could go left or right when shooting into a mirage. To overcome this illusion try and follow how the mirage is moving across the target and then hold over off  center of the target. This is a tough skill to learn and just understand that a mirage is both your friend and your enemy at the same time.

Temperature

Temperature impacts the vertical travel of the bullet. The higher temperature creates less density in the air so there is less drag on the bullet. Less density means the faster the bullet will travel upward. A

20 degree shift in temperature can cause a 1 MOA difference, if you zeroed your scope in 50 degree weather and then shoot it in 70 degree conditions you may be off by one inch for every 100 yards. No big deal at 100 yards but at 500 yards your shot will be off by 1 MOA or 5 inches; and at 1000 yards a 1 MOA difference is a 10 inch miss.

Elevation

The same is true with elevation, if you zero your scope at 3000 feet elevation and then climb up to 5000 feet your shot will be off 1 MOA. As a general rule, for every 2000 feet in gain of elevation there is a 1 MOA upward travel of the bullet. The reverse is true when you go from a high elevation to a low elevation; again as a general rule, the bullet will travel downwards 1 MOA for every 2000 feet of elevation decline.

Rain

Rain and humidity play a role as well. Humidity impacts the drag on the bullet. The more moisture the more drag. Some use this rule: for every 20 percent increase in humidity the shooter adjusts up by 1 MOA.

Other factors

Spin drift of the bullet causes the bullet to slide off course in small increments over longer distances, but with good data input to your ballistic calculator spin drift will be taken into consideration. The earth curvature at extreme ranges impacts trajectory as well, however, shooting out to 1000 the earth’s curvature has little impact.

Shooting Up or Downhill

If you shoot at a high angle, up a canyon wall or down into a valley, both will have the same impact, the bullet will travel high. The cause for this over shot is because there is a lower gravitational force applied to the bullet’s path based on how steep the angle is to the target and the distance to the target.

A steeper angle has less gravitational force on the bullet and therefore less bullet drop. There is a math formula that compensates for a lower bullet drop used when shooting up or down. First you have to determine the distance to the target (by a range finder or the mil dots on your scope), the cosine of the angle, and the bullet drop at the distance in inches shown on your ballistic chart.

A five degree angle has a cosine of .99; a 10 degree angle .98; a 15 degree angle .96; a 20 degree angle .94; a 25 degree angle .91; and 30 degree angle has a cosine of .87.

The math solution is (bullet drop at range x cosine = new bullet drop) you can refer back to your ballistic chart and determine your new shorter range by subtracting the new bullet drop.

For example if you range is 500 yards with a bullet drop of 57 inches and you angle is 20 degrees; the math is: 57x.94=53.5. So you need to adjust by 3.4 inches. The longer the distance and the steeper the angle it becomes more important to apply this formula.

A cosine device can be purchased that mounts on your scope, or if you are using a range finder some provide both distance and angle to the target.

Taking the Shot

Just aiming and shooting may work fine at short distances and at big targets; but the more distance between you and the target the more technique required, and especially trigger control.

We start by working backwards from the muzzle to the butt of the stock.

First, you secure your bi-pod; is it tight to the stock is its legs  level, are you resting the legs on a soft or hard surface, if the legs  are on concrete vs. dirt you have lost a stable platform. Your hard rifle needs a soft surface to fire from in order to provide a solid base. A rifle grounded to a hard surface will produce an unstable firing platform. If you do not use a bi-pod use bean bags or the cup of your  hand to a tree branch to provide a soft contact point for the rifle to  absorb the shock waves from the recoil pulse. When using a bi-pod move slightly forward to provide proper tension to its legs before the trigger pull.

The Prone position is the most stable shooting position your gun and body. Position your hips behind the gun, legs spread past your shoulders, and ankles flat to the ground. Legs and hips must stay still or you will cause lateral movement in your shot. Your non-firing hand needs to cup the butt end of the stock and place it firmly to your shoulder.

The rifle needs to be level; a canted rifle will send the bullet on a curved path away from the target. The more the rifle is off center and the greater the distance, the bigger the miss. An anti-cant device, (an overpriced bubble level), mounted to the scope will eliminate this issue.

The next step is to find your natural point of aim. Looking through your scope set your body firm into the ground until there is no horizontal movement in the scope. When you have found that place where  the only movement you see is straight up and down, (the scope’s vertical  axis), you have found the natural point of aim. The only movement that should be seen is the vertical movement up and down the vertical center line of your scope as you inhale and exhale. Each inhale and exhale moves the target up and then down from the center point of aim. Once you  have reached physical and mental stillness take one breath in and exhale  slowly, then hold it as you pull the trigger straight back at a 90  degree angle.

In the brief moment before the trigger is pulled, your mind should start entering into a zone of precision focus, your mind should become crystal clear. You may even hear your heart beat, and all the noise around you may seem like it has disappeared. Everything goes perfectly quiet now that your mind is in a meditative state; in this zone there is no thinking and there are no distractions, the rifle becomes you and you become the rifle.

In your mind you see where the bullet will hit before the trigger is  even pulled, you already know its path because you have focused all of  your will to its outcome, and before the trigger is pulled you breath is  merged into the trigger.

What seems like a simple act to pull the trigger are the last and the most important final body contact you make with the gun. It alone will determine a good shot from a bad one. The second pad of your index  finger should rest just above the curve of the trigger, your hand is  firm around the stock, as firm as a handshake, your index finger is at a

90 degree angle to the trigger, your pull is smooth and uninterrupted, the force is consistent, and the finger holds the trigger until the recoil pulse has ended. A sight pull to the right of the trigger finger and the bullet goes left; a pull to the left, the bullet goes right. After the recoil pulse settles down you may find there is brief moment of silence, the finger can now be released.

And once you have taken your shot, all the learning, experiments, the practice, the quality of gun, scope, and bullet come down to this moment and it is the reason we shoot. You hear the gong, (bullet hitting  steel), and you see the violent jerking movement of the target from the  pure power of the bullet’s impact, your body surges in adrenaline  created by you own success. Nobody else shares this success. It is all you, and that is why we shoot long.

Ralph Hicks


Tags: , , ,

Gallery update “Justin’s “BA” B&C Savage

Posted in Bell and Carlson Stocks, CDI, Gallery, Savage, Savage EGW Tactical Scope Base, TacOps Cheekpad, Tactical Operations on February 28th, 2012 by Team TW

Our gallery has been updated to include Justin’s “Bad Ass” B&C Savage. Click on the photo for more info.

Justin's "BA" Bell and Carlson Savage

Justin’s “BA” Bell and Carlson Savage

CDI/Choate Tactical Package Installation

Posted in CDI, Choate, DIY, Savage on September 22nd, 2011 by Team TW
CDI Precision Savage Bottom Metal

CDI Precision Savage Bottom Metal

We have been offering CDI Precision Gunworks Bottom Metal and Choate’s Tactical Stock for a while now. One of the top questions that we have been receiving is, “Can I buy the Choate stock and have you inlet it for the CDI bottom metal”? You asked and we have delivered!  We now offer our Choate Tactical stocks already inletted for the CDI bottom metal.

Read more »

Tags: , ,

Gallery Update Ian’s Single Shot .300 WinMag

Posted in Choate, Savage, Savage EGW Tactical Scope Base, Tactical Works Home on December 15th, 2010 by Team TW

Savage Choate Long Action Tactical Stock .300 WinMag

Tags: , ,

Proper Bolt Cycling Techniques

Posted in Remington 700, Savage, Savage Tactical Bolt Handle, Tactical Works Home on November 18th, 2010 by Team TW

This is a great demonstration by Holland Shooting Schools that helps the shooter understand how to properly cycle the bolt while keeping the target in your field of view.

Depending on your specific use, an oversized/tactical bolt knob/handle may help you increase your purchase and leverage on the bolt helping to cycle the bolt quicker. In high stress situations the ability to quickly “feel” and cycle the bolt again aids in workflow and keeps the target in constant view. If you use your rifle in extreme weather conditions consider a knurled knob for better grip.

Many competitive shooters who run rapid fire drills use extended oversized bolt knobs to reduce the time needed to reload so that they can have more time on target acquisition and workflow adjustment prior to the next shot.

Enjoy,

[youtube=https://www.youtube.com/watch?v=OKDWMEoZS8o&fs=1&hl=en_US&color1=0x3a3a3a&color2=0x999999]

Tags: , , , ,