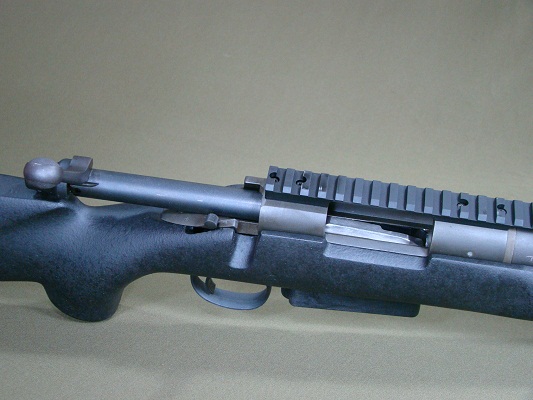
Badger Ordnance M5 Choate Tactical Stock Package Installation
Posted in DIY, Remington 700, Tactical Works Home on December 14th, 2010 by Team TW
Warning!
Before starting work on any firearm be sure that the firearm is clear. Do not touch the trigger until the firearm has been cleared. Inspect the chamber to ensure that it is clear of ammunition and that there is no ammunition positioned to be chambered. Do not keep live ammunition near your workspace. Once you have checked the firearm, check it again!
Tactical Works, Inc. takes no responsibility for the accuracy and/or safety of this “how to”. This post is simply for your reading enjoyment. Before shooting any firearm have it inspected by a qualified gun smith.
Installing the Badger Ordnance M5 Trigger Guard with the Choate Tactical Stock
Until now installing a dropbox magazine on your Remington 700 ADL or BDL required sourcing all of the parts and then sending your stock off to a gunsmith to be inletted. This required paying to ship your stock, waiting, and then paying to have the stock sent back. Now you can order a complete solution that is bolt-on, out-of-the-box, and can be assembled in less than an hour without special tools.
Parts:
- Choate Tactical Stock Inletted for the Badger Ordnance M5 Trigger Guard.
- Badger Ordnance M5 Trigger Guard Kit. (kit includes trigger guard, 5-shot magazine, 2 #3o Torx screws, 2 aluminum pillars)
Tools:
- 5/32 Hex/Allan Key
- #30-Torx Driver and/or Socket
- Calibrated Torque Wrench
Time:
Less than one-hour.
Remove all optics and accessories that might get in the way or be damaged during installation. Our subject rifle is a Remington 700 PSS. The original floor plate has been replaced with a MagXtender however, installation is the same for rifles that have the OEM floor plate.
Remove the Bolt from the rifle. Press the Bolt Release button which is located in the top of the trigger guard in front of the trigger.
While the Bolt Release button is depressed, slide the bolt all the way back until the bolt is free of the action. Set the bolt aside until ready to reassemble.

Use a 5/32″ Hex key to remove the two trigger guard screws.

Once both action screws are removed, the trigger guard will be free from the original stock and barreled action. Gently pull the trigger guard from the stock while supporting the barreled action. Make sure the barreled action is supported or it will drop free from the stock and can be damaged.
Remove the trigger guard and the internal magazine box from the stock. The entire trigger guard and internal magazine will not be reused. Remove parts from the workspace for the remainder of the installation. Remove the barreled action from the stock and place it out of the way as well. The stock will not be used again for this project.
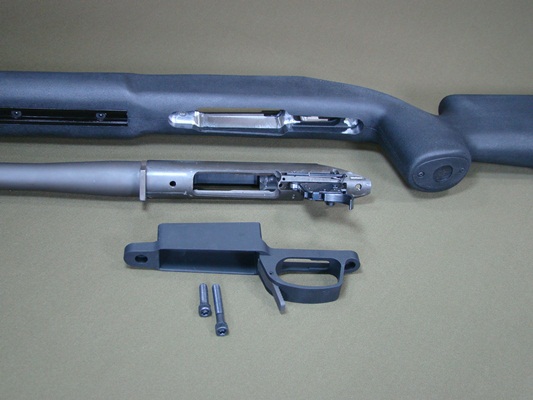
Gather the new Choate Tactical Stock, the Badger M5 Trigger Guard, and both of the supplied T-30 Action Screws and place them on your workspace. The supplied Badger Ordinance Pillars are not used for this application. This is due to the full length aluminum bedding block used in the Choate Tactical Stock.
Place the barreled action into the Choate Tactical Stock. Supporting the barreled action, turn the rifle over and insert the Badger Ordnance M5 Trigger Guard into the inlet stock. Insert the longer of the two #30-Torx action screws into the rear of the trigger guard. The shorter of the two #30-Torx action screws installs in the front of the trigger guard.
To get the action screws started, thread them by hand to avoid damaging the threads on the action screws and more importantly the action. Once the action screws are started, slowly and carefully tighten them equally taking time to make sure neither of the action screws are too long. If one or both of the action screws are too long you will need to either trim the supplied action screws or purchase new shorter screws. The action screws are a 7/28 thread that can be found at most chain hardware stores.
When both action screws are snug and are the proper length to clear the bolt use a #30-Torx driver to torque them to 65 in-lbs. Caution! Failure to torque the action bolts with a calibrated Torx Driver may result in damage to the rifle! Per Badger, LocTite not needed.
After installing the trigger guard double-check that the action screws will clear the bolt and install the bolt. Next insert the supplied Accuracy International 5-shot magazine into the Badger Trigger Guard. With the rifle unloaded cycle the bolt to make sure that the bolt cycles freely and does not hang up on the magazine.
Installation complete.


